구글 firebase 클라우드 메시징 이용하여 모바일 push 전송
[Firebase 콘솔 접속]
로그인 - Google 계정
하나의 계정으로 모든 Google 서비스를 Google 계정으로 로그인
accounts.google.com
1. Firebase 프로젝트 추가 (기존 생성된 프로젝트 이용해도 무방)

2. 프로젝트 생성 후 설정 페이지 이동

3. 설정 > 일반 에서 앱을 추가 (웹을 이용하기 위해서 웹앱을 선택)

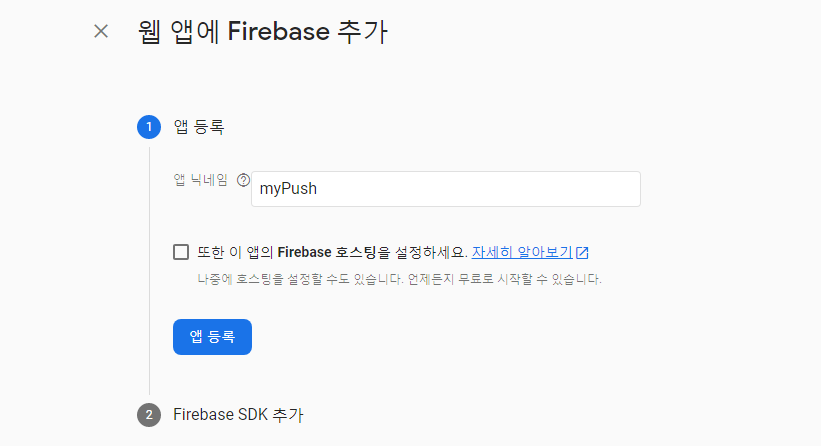
* 앱 등록이 되면 내앱이 생성된다.
이것으로 firebase 설정은 완료 하였으면 나머지는 메시지 전송을 위한 web 코드를 작성한다.
* 모바일 기기로 메시지를 보내기 위해서는 모바일 기기의 token 값 를 알아야 한다.
1. 두개의 파일을 생성
- token.html
- firebase-messaging-sw.js
token.html 과 firebase-messaging-sw.js 사이에서 token 값을 받아오게 되며 firebase-messaging-sw.js 는 받드시 동일한 이름으로 생성하고 같은 경로에 생성하야 한다.
token 구하기
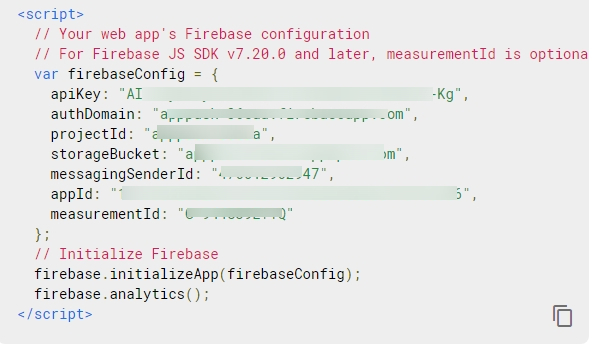
config 정보는 firebase 의 생성된 정보를 보고 참고한다.
token.html
<script src="https://www.gstatic.com/firebasejs/5.5.9/firebase.js"></script>
<script>
	// Initialize Firebase
	var config = {
		apiKey: "xxxxxx",
        authDomain: "xxxxxx",
        projectId: "xxxxxx",
        storageBucket: "xxxxxx",
        messagingSenderId: "xxxxxx",
	};
	firebase.initializeApp(config);

	const messaging = firebase.messaging();

	//token값 알아내기
	messaging.requestPermission()
		.then(function () {
			console.log("Have permission");
			return messaging.getToken();
		})
		.then(function (token) {
			document.write(token);

            // token 을 받아온다.

		})
		.catch(function (arr) {
			console.log("Error Occured");
		});


</script>
firebase-messaging-sw.js
importScripts('https://www.gstatic.com/firebasejs/4.8.1/firebase-app.js');
importScripts('https://www.gstatic.com/firebasejs/4.8.1/firebase-messaging.js');

// Initialize Firebase
var config = {
    apiKey: "xxxxxx",
    authDomain: "xxxxxx",
    projectId: "xxxxxx",
    storageBucket: "xxxxxx",
    messagingSenderId: "xxxxxx",
};
firebase.initializeApp(config);

const messaging = firebase.messaging();
messaging.setBackgroundMessageHandler(function (payload) {

    const title = "Hello World";
    const options = {
        body: payload.data.status
    };

    return self.registration.showNotification(title, options);
});
2. 모바일에서 해당 token.html 을 열어서 token 값을 얻어온 후 token 값을 가지고 메시지 전송 발송 API 를 이용해 발송 한다. 여기서는 POST 전송 테스트 를 위해 크롬 브라우저의 POST 맨을 이용해 간단히 발송 테스트만 진행한다.
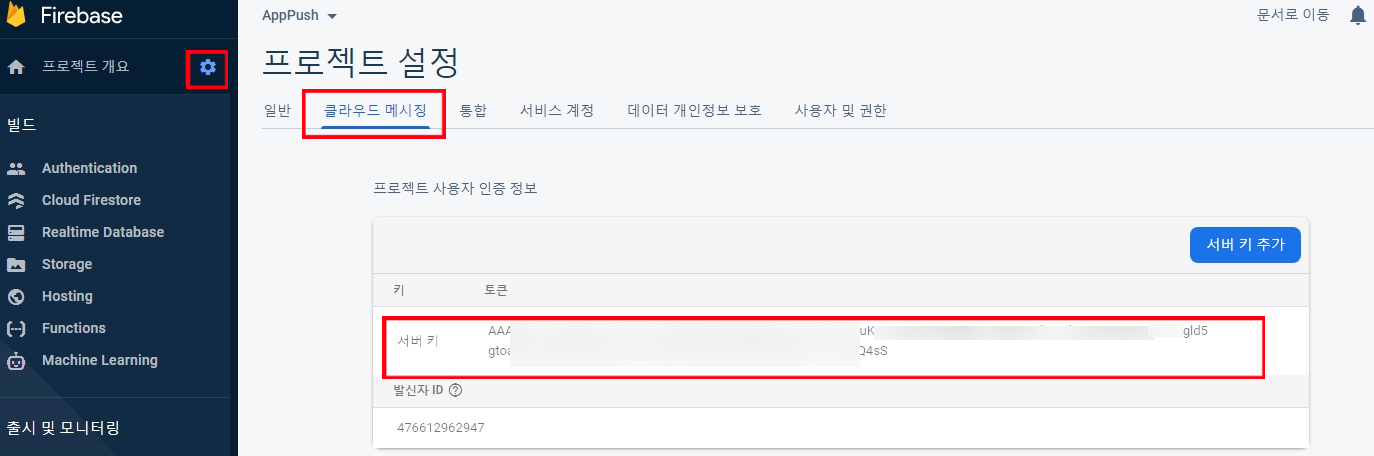
우선 발송을 위해서는 API 인증에 필요한 서비키가 필요하며 서버키 정보는
프로젝트 설정 > 클라우드 메시징 탭에서 확인 가능
3. 전송 테스트 하기
- 전송 URL : https://fcm.googleapis.com/fcm/send
- 헤더 정보
Authorization , key=Firevase 서버키
Content-Type , application/json
- 바디 데이터(json 데이터)
- to : 앞서 받아온 token 정보
- notification.body : 메시지 내용
- notification.title : 메시지 제목
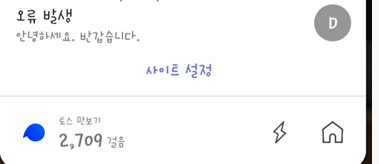
{ "to" : "xxxxxxxxxxxxxxxxxx", "priority" : "high", "notification" : { "body" : "안녕하세요. 반갑습니다.", "title" : "오류 발생" }, "data" : { "title" : "", "message" : "" } }
POST 발송 요청

POST 발송 응답

메시지 수신 결과
'Server > 클라우드' 카테고리의 다른 글
| [오라클 클라우드] 공용IP(임시) 전용IP 로 변경하기 (0) | 2021.08.30 |
|---|---|
| [오라클 클라우드] 리눅스(linux) 서버 무료 이용(프리티어) 및 SSH 접속, 공용 IP 변경 (0) | 2021.08.30 |